【Python tkinter】境界線(縦線・横線)を引く方法:ttk.Separatorウィジェット
公開日:更新日:
本記事では、Pythonにおけるtkinter.ttkモジュールのSeparatorウィジェットの詳しい使い方を解説していきます。
TkinterはPythonでGUIアプリケーション開発をする際に使用されます。
TkinterによるGUIアプリケーション開発では、豊富に用意されているウィジェットを駆使して開発を進めていきます。
Tkinterでは12種類、ttkにはプラス6種類した18種類のウィジェットが使えます。
本記事で解説するttkのSeparatorウィジェットでは、境界線(縦線・横線)を引くことができます。
Separatorウィジェットでどのように境界線を引くのかを見ていきましょう。
Separatorウィジェット
Separatorウィジェットとは
Separatorウィジェットとは、ウィジェットとウィジェットの間に、縦または横の薄い境界線(仕切り)を引くためのウィジェットです。
Tkinter.ttkモジュールのTkテーマ付きウィジェットであるため、Separatorウィジェットを使用するには、ttkをインポートする必要があります。
import tkinter.ttk as ttk
Separatorウィジェットを作成するために、次のようにttk.Separatorを使います。
sep = ttk.Separator(parent, options)
作成したSeparatorオブジェクトを配置することで、横幅2ピクセルの線を表示することができます。
オプション一覧
Separatorウィジェットを作成する際に使えるオプション一覧を以下に記します。
| オプション | 説明 |
|---|---|
| orient | 境界線の方向(horizontalまたはvertical) |
| style | スタイルの指定 |
| cursor | ホバー時のカーソルの指定 |
境界線の長さを調整する
Separatorウィジェットをそのまま配置すると、線ではなく点で表示されます。
これは境界線の長さを調整していないからです。
縦または横いっぱいに境界線(仕切り)を伸ばすには、Separatorウィジェットを配置する際に次のようにfillまたはstickyを使います。
separator.pack(fill="both")
separator.grid(row=0, column=0, sticky="ew")
境界線をここから短くするには、パディングpadxまたはpadyを使います。
これらパディングを指定して、境界線(仕切り)の長さを調整していきます。
境界線の色を変更する
Separatorウィジェットの色を変更するには、スタイル(Style)で外観を変更します。
まずは次のように、変更したい色のスタイルを作成します。
style = ttk.Style()
style.configure("blue.TSeparator", background="blue")
上記では「blue.TSeparator」という名前のスタイルを新たに作成しています。
backgroundで色を青に指定しています。
この作成したスタイルは以下のようにSeparatorウィジェットのオプションstyleで指定します。
separator = ttk.Separator(root, orient="horizontal", style="blue.TSeparator")
これにより、青色の境界線を引くことができます。
縦・横の境界線を引く
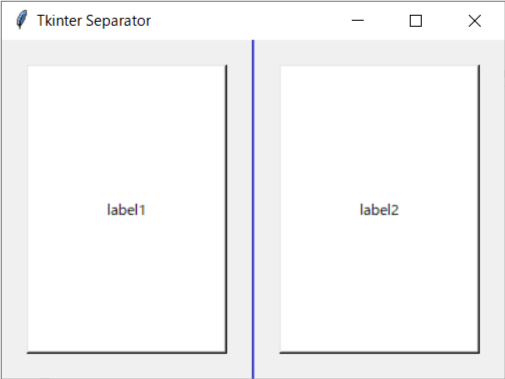
縦の境界線
FrameウィジェットとFrameウィジェットの間にSeparatorウィジェットで縦の境界線を引きます。
縦の境界線を引く場合は、オプションのorientでverticalを指定します。
import tkinter as tk
import tkinter.ttk as ttk

# メインウィンドウの作成
root = tk.Tk()
root.title("Tkinter Separator")

root.rowconfigure(0, minsize=250, weight=1)
root.columnconfigure(0, minsize=200, weight=1)
root.columnconfigure(2, minsize=200, weight=1)

# Styleの指定
style = ttk.Style()
style.configure("blue.TSeparator", background="blue")

### Widgetの作成 ###
frame_left = tk.Frame(root)
separator = ttk.Separator(root, orient="vertical", style="blue.TSeparator")
frame_right = tk.Frame(root)

label1 = tk.Label(frame_left, text="label1", relief="raised", height=15, bg="white")
label2 = tk.Label(frame_right, text="label2", relief="raised", height=15, bg="white")

### 配置 ###
frame_left.grid(row=0, column=0, rowspan=2, sticky="nsew", padx=20, pady=20)
separator.grid(row=0, rowspan=2, column=1, sticky="ns")
frame_right.grid(row=0, column=2, sticky="nsew", padx=20, pady=20)

label1.pack(fill="both")
label2.pack(fill="both")

root.mainloop()
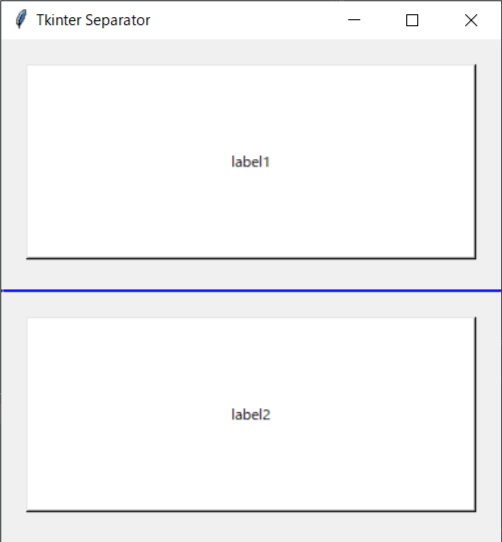
横の境界線
FrameウィジェットとFrameウィジェットの間にSeparatorウィジェットで横の境界線を引きます。
縦の境界線を引く場合は、オプションのorientでhorizontalを指定します。
import tkinter as tk
import tkinter.ttk as ttk

# メインウィンドウの作成
root = tk.Tk()
root.title("Tkinter Separator")

root.rowconfigure(0, minsize=200, weight=1)
root.rowconfigure(2, minsize=200, weight=1)
root.columnconfigure(0, minsize=400, weight=1)

# Styleの指定
style = ttk.Style()
style.configure("blue.TSeparator", background="blue")

### Widgetの作成 ###
frame_top = tk.Frame(root)
separator = ttk.Separator(root, orient="horizontal", style="blue.TSeparator")
frame_bottom = tk.Frame(root)

label1 = tk.Label(frame_top, text="label1", relief="raised", height=10, bg="white")
label2 = tk.Label(frame_bottom, text="label2", relief="raised", height=10, bg="white")

### 配置 ###
frame_top.grid(row=0, column=0, sticky="nsew", padx=20, pady=20)
separator.grid(row=1, column=0, sticky="ew")
frame_bottom.grid(row=2, column=0, sticky="nsew", padx=20, pady=20)

label1.pack(fill="both")
label2.pack(fill="both")

root.mainloop()
まとめ
本記事「【Python tkinter】境界線(縦線・横線)を引く方法:ttk.Separatorウィジェット」はいかがでしたか。
境界線を引けるようになると、GUIアプリケーションをより使いやすく、見た目もモダンなものにできます。
ぜひttkに用意されているウィジェットを使いこなして、より使いやすいGUIアプリ開発に活かしてください。
この記事の執筆者


 関連記事
関連記事